Serving Tidewater · Mon–Fri 9:00 – 5:00
Deck Design Guide · Updated September 2026
Short answer: it's a border of decking boards run around the outside edge of your deck, a different direction than the rest of the boards, so the whole thing reads like a photo in a frame instead of a plain plank floor. It costs a little more. Here's what it actually is, how it goes together, and a real deck we built with it in Norfolk.
Picture-frame decking is a border built from deck boards installed around the perimeter of a deck, running a different direction than the main "field" boards in the middle — usually perpendicular to them, sometimes at a mitered 45-degree corner. It's called picture-frame decking because that's exactly what it looks like: a frame running around the edge of the surface, the way a wood frame runs around a photo.
The practical reason it exists is almost as good as the visual one. Every deck board has two cut ends, and on a plain deck those ends just butt up against the outer joist or a fascia board, visible if you look closely. A picture-frame border covers every one of those cut ends in one clean line, so the edge of the deck looks intentional instead of like a floor that got cut off.
A picture-framed deck reads as a step up in quality the second you see it, and homeowners usually assume it costs a lot more than it does. It's a real upgrade, but it's a finish detail, not a structural one — you're paying for extra material, extra blocking, and more careful layout and cutting, not a different kind of deck.
A picture-frame border isn't complicated, but it does need a few things planned in before the first board goes down, not figured out halfway through: None of this is exotic, and none of it costs much on its own. What it does cost you, if you skip it, is the ability to fix a mismatched spacing problem after the field boards are already screwed down.
More than the raw square footage of the border suggests, because of the miter cuts. Every 45-degree corner turns a chunk of a board into waste, and the longer boards used for a clean, joint-free run around a typical deck perimeter cost more per foot than the same total footage in shorter field boards. On a real takeoff we usually plan for meaningfully more waste on the border alone than on the entire rest of the field, which is the actual reason a picture-frame border moves the material total more than its square footage alone would suggest.
The order matters more than people expect. We install the border boards first, then work the field boards in toward them, not the other way around. Doing it in that order makes it much easier to land on even spacing between the border and the field, instead of ending up with an awkward sliver of a board at the edge.
Anywhere the border runs the same direction as the joists underneath it, it needs extra blocking added to the frame first — a board resting on nothing but its own ends isn't fastened along its length and will eventually flex or squeak. This is a framing-stage decision, which is exactly why we plan the border before we ever close in the deck's structure, not after.
A single-width border is the simplest version, one board running the perimeter. A double or triple frame repeats the border two or three boards deep for a bolder look. Corners can either butt together or, for the cleanest finish, get mitered at 45 degrees so the border wraps the corner like an actual picture frame instead of showing a butt joint at every turn.
| Border Style | Boards Deep | Best For |
|---|---|---|
| Single | 1 board | A clean edge without a heavy visual statement |
| Double | 2 boards | A bolder frame, often in a contrasting color |
| Triple | 3 boards | Larger decks where a single board would look thin |
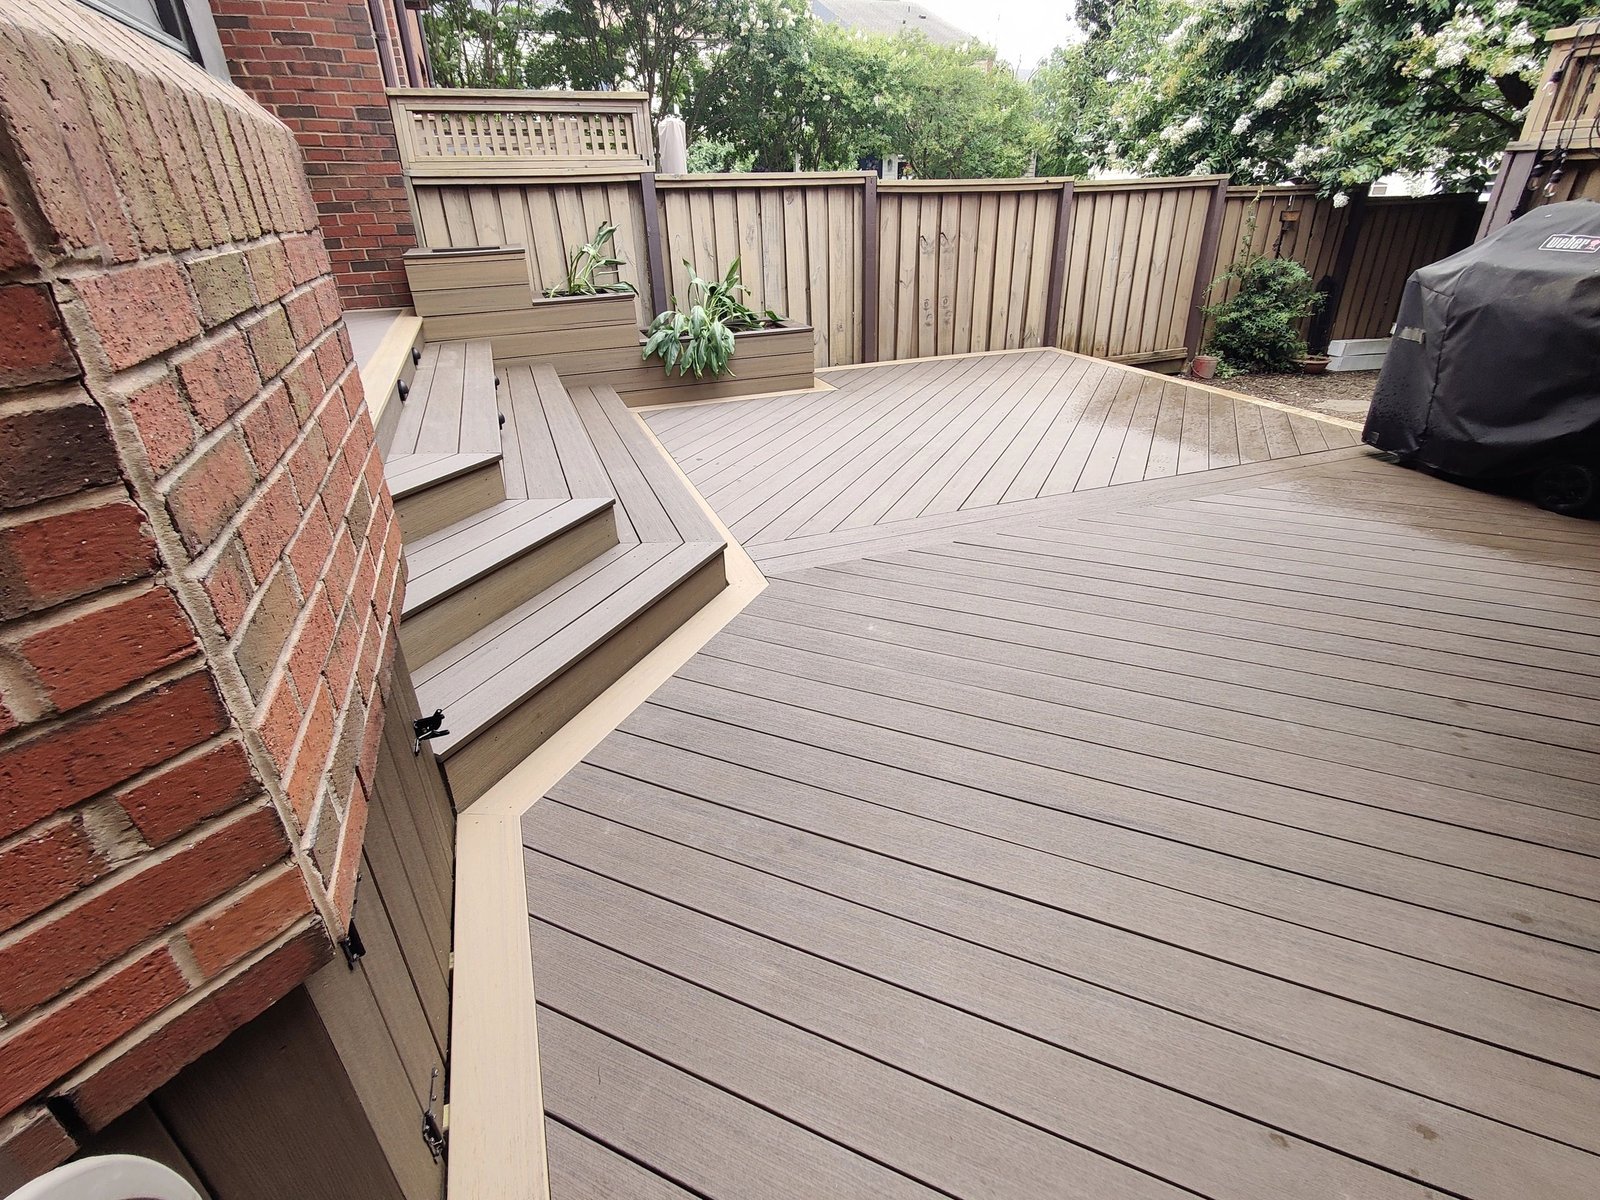
This isn't just a technique we read about. On a deck we built in the Freemason neighborhood of Norfolk, the project called for fitting a new deck into an already-established city backyard, matching an existing privacy fence rather than starting from scratch. We laid the composite decking in a diagonal pattern with a picture-frame border around the edge — a detail that adds real visual interest and a finished look without changing the deck's actual footprint. The border also gave us a clean line to work the diagonal field boards into, which is one of the real practical reasons the two techniques pair so well — a diagonal pattern run all the way to the outer joist leaves awkward little triangle cuts at the edge, and the border simply absorbs that problem instead of showing it off. See the full project →
Yes to all three. Most composite and PVC decking lines are built with picture-framing in mind, and a contrasting-color border is one of the most common ways to use a second color on a composite deck without overdoing it. Natural wood picture-frames just as well, though in Hampton Roads' salt air and humidity, a composite or PVC border tends to hold its line and color longer than a painted or stained wood border does. Most homeowners pick one of two directions: a matching-tone border for a subtle, seamless edge, or a contrasting color for a border that reads as a deliberate design choice rather than a construction detail. Neither is more correct than the other — it comes down to whether you want the frame to disappear or to stand out.
A picture-frame border works cleanest on a single-level deck with straight edges, since every corner is a simple 45-degree miter. On a multi-level deck, each level typically gets its own border rather than trying to wrap one continuous frame across a step-down, which actually reads better visually anyway — it reinforces that each level is its own defined space. A curved edge is possible but requires either steam-bent boards or a series of small-angle cuts approximating the curve, which is enough extra labor that we walk clients through whether the effect is worth it before committing to it.
\n\nInstalling the border without adding the extra framing underneath it, so the board flexes over time instead of sitting solid.
Makes it much harder to land on clean, even spacing where the field meets the border, instead of one awkward sliver piece.
A mitered corner that's off by even a couple degrees is obvious at exactly the spot meant to look the most finished.
Railing post locations decided after the border is down can force an ugly compromise right through the frame line.
Ashleigh and I plan a picture-frame border, if you want one, during the design phase — not as an afterthought once the field boards are already down. That means figuring out post locations, blocking, and corner details before a single board is cut, the same way we handle it on every deck we build across Hampton Roads. It's a small design detail with a real, visible payoff, and it's worth getting right the first time rather than working around it later. If you already know you want a border, tell us during the first conversation, not after the design is finalized — it changes the framing plan, and framing is not something we like to revisit once a deck is closed in.
Picture-frame decking is a border of boards installed around the perimeter of a deck, running a different direction than the field boards, the way a picture frame runs around a photo. It covers the cut ends of the field boards and gives the whole deck a clean, finished edge instead of an exposed board-end look.
Yes, a bit. It uses extra material for the border, extra blocking underneath it, and more layout and cutting time than a standard deck. It is a finish upgrade, not a structural necessity, so the added cost is real but modest compared to the total project.
Yes. Most composite and PVC decking lines are designed with picture-framing in mind, and a contrasting-color border is one of the most common ways homeowners use a second color on a composite deck. It works with natural wood too.
Yes. Anywhere a board runs parallel to the joists below it, including most picture-frame borders, needs extra blocking added to the frame so the board has something solid to fasten to along its full length, not just at the ends.
Yes, and it is one of our favorite combinations. We built exactly this on a deck in Freemason, Norfolk: field boards run diagonally, with a picture-frame border around the outside to give the diagonal pattern a clean edge to end into.
Replacing a single board is about the same either way. Where it gets more involved is if a mitered corner needs to be redone, since matching that angle cut cleanly takes more care than swapping a straight field board.
Written by Ashleigh & Joey, Evoke Design + Build
Husband-and-wife design-build team serving Hampton Roads since 2017. Ashleigh handles design, Joey runs construction. Licensed & insured contractor. Read more about us →
We'll plan the border, the pattern, and the framing before a single board is cut.